Halloween Ribbon Wreath Tutorial: How to Make a Halloween Wreath That Bewitches and Enchants
, by OuterBox, 10 min reading time
, by OuterBox, 10 min reading time
As the autumn winds usher in the mystique of October, homes everywhere begin to don their spookiest attire. If you're looking to elevate your Halloween decor game this year, you've come to the right place. This article will guide you through crafting a Halloween ribbon wreath that's not just eerie but also enchantingly elegant. Perfect for those who want to bewitch their guests and neighbors, this handmade Halloween ribbon masterpiece promises to be the crowning jewel of your spooky season decorations. So, grab your Halloween ribbon and let's dive in!
Crafting a captivating Halloween wreath with ribbon is both fun and rewarding. Before you start to make a Halloween wreath, you'll want to gather all the necessary materials to ensure a smooth and enjoyable crafting experience.
Choose between a foam or wire wreath form based on your preference. Foam forms are great for beginners as they're easy to wrap ribbons around, while wire forms offer more flexibility for intricate designs.
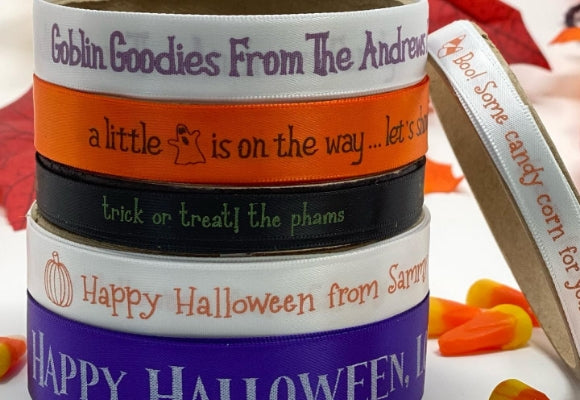
Gather a variety of Halloween ribbons in different textures, colors and patterns. You can even personalize Halloween ribbon with spooky phrases and greetings! Consider classic Halloween shades like black, orange and purple, as well as ribbons with spooky prints like pumpkins, witches or ghosts. Satin, grosgrain and burlap are popular textures that can help add depth to your wreath.
A glue gun is essential for attaching ribbons and decorations securely. Just remember to use caution when working with a hot glue gun to prevent burns.
A sharp pair of scissors will ensure clean cuts for your ribbons, which will give your wreath a polished look.
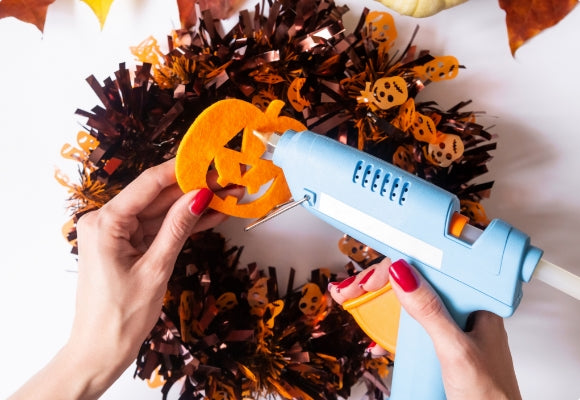
Elevate your Halloween wreath's spook factor with embellishments like plastic spiders, bats, miniature skulls and faux cobwebs. You can also consider adding small LED lights or glow-in-the-dark elements for added enchantment.
Once your wreath is complete, you'll need something sturdy to hang it. Twine offers a rustic look, while a wide ribbon can provide additional flair.
Before you begin, lay out all your materials on a spacious, flat surface. This will allow you to easily visualize your design and ensure you have everything you need at arm's reach.
Selecting the perfect ribbon can make or break your Halloween wreath. Traditional Halloween colors like oranges, blacks and purples are classic choices, but consider branching out with moody blues, blood reds or shimmering metallics for a modern twist. Personalized ribbons with themed prints, such as bats and ghosts, or textures like sleek satin, rustic burlap or eerie lace can elevate your Halloween wreath craft design. Remember to mix and match—combine various colors, patterns and textures for depth, but ensure harmony to avoid a chaotic look. Ultimately, let your creativity guide you, and choose ribbons that resonate with your overall Halloween vision.
Now it's time to dive into the actual steps of making a Halloween wreath. This is your opportunity to create a piece of Halloween decor that's uniquely yours, reflecting both the spooky spirit of the season and your individual style. With a sprinkle of imagination and our Halloween ribbon wreath tutorial below, you'll learn how to transform simple ribbons and embellishments into a bewitching display.
Start by selecting a foam or wire form. For a denser look, wrap a solid-color ribbon around the form, securing the ends with a hot glue gun.
Measure and cut ribbons in varied lengths for a dynamic look. For a whimsical touch, consider leaving some ribbons longer to dangle. Begin attaching ribbons by either tying them around the form or using hot glue for a more permanent hold. Layer and overlap different ribbons, ensuring a mix of colors, textures and patterns for visual intrigue.
Accentuate your wreath with Halloween-themed embellishments. From plastic spiders crawling over ribbons to bats soaring between folds, strategically place these decorations, securing them with hot glue. For added ambiance, intertwining small LED lights can create a haunting glow.
Remember, while this guide provides a foundational approach, there's no limit to your creativity. Let your imagination run wild!
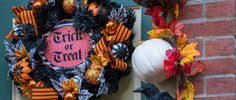
Showcasing your Halloween ribbon wreath is all about choosing the perfect spot and ensuring its safety. While the front door is a traditional favorite, windows or above the fireplace can be equally striking locations. Use over-the-door hangers for doors or sturdy hooks for walls and windows. If your wreath boasts elements like LED lights, ensure wires are discreetly tucked away. Adding a decorative bow or a themed sign, such as "Happy Halloween," can provide a final festive touch, making your wreath a captivating focal point for all to enjoy.
Crafting the perfect Halloween ribbon wreath can be a delightful endeavor. To elevate your creation and simplify the process, consider these handy tips and tricks:
Remember, the most enchanting wreaths are born from creativity, experimentation and a touch of Halloween magic. Don’t be afraid to think outside the box and let your imagination take the lead.
Venturing into the realm of DIY Halloween decorations, especially ribbon wreaths, can come with its fair share of queries. Whether you're a seasoned craft enthusiast or a beginner eager to dabble, we've gathered some of the most common questions about creating a Halloween ribbon wreath to guide your creative journey.
The amount of ribbon needed largely depends on the size of your wreath form and the desired fullness of the final product. Typically, for a standard 14-inch wreath form, you might require between 10 to 20 feet of ribbon. If you're aiming for a densely packed, voluminous look, err on the higher side. However, for a simpler or more spaced-out design, the lower end might suffice. It's always a good idea to purchase a bit extra, ensuring you have room for experimentation and adjustments.
Absolutely! Incorporating natural elements can give your wreath a rustic, earthy touch. Dried flowers, especially those with dark or muted tones, can add an eerie elegance. Twigs and branches, when positioned like spider legs or creepy fingers, can add a spooky touch. Just ensure they are securely attached and free from pests.
Yes, with some careful crafting, you can design interchangeable wreaths. Instead of gluing decorations directly onto the wreath form, attach them to ribbon loops or pins. This allows you to swap out Halloween-themed elements for those of other holidays. For example, after Halloween, replace spooky ribbons and decorations with autumnal ones for Thanksgiving.
As Halloween draws near, there’s no better companion in your crafting journey than Name Maker. Whether you're aiming for a Halloween wreath that's hauntingly elegant or whimsically playful, our wide selection of Halloween ribbons ensures your vision comes to life perfectly. Let Name Maker be a part of your Halloween tradition, bringing a touch of personalized magic to every corner of your home.
Shop Halloween RibbonsSelecting the right ribbon size is crucial to ensure your personalized ribbon complements your design. Learn how to select the perfect one for your personalized ribbon needs.

Discover some incredibly beautiful wedding bouquet ribbon ideas and other ingenious tips for using personalized wedding ribbon for your big day.

Want to make this Christmas special? DIY Christmas gift tags are a fun, creative and affordable way to add a personal touch to your holiday gift-giving this year.